
Create an invoice and save it as a draft
What it is and why it matters
An invoice is a clear, itemized request for payment. In a grooming or beauty salon you might use one for a package of sessions paid up front, a big job like a full dematting or a bridal party, a deposit on a group booking, or a balance a client asked to settle later.
In Syndra, invoices live in Payments on the Invoices & Estimates tab. This article shows you how to build a one-off invoice and save it as a draft. A draft stays in your invoice list, where you and your team can check it, edit it, or copy it later. Sending an invoice isn't covered here.
What you need before you start
- Availability depends on your plan.
- Access to Payments. You'll need a Syndra login that can open Payments. If you can't see it in the left-hand menu, ask your account admin.
- The client's details. You can pick an existing contact, or add a new one from inside the invoice.
- Your services or products (optional). You can pick from your product list or type an item in as you go.
- You don't need a payment provider connected to build and save a draft. You'll see a blue banner about payment gateways, but it doesn't stop you saving.
Steps
In the left-hand menu, click Payments, then click the Invoices & Estimates tab.
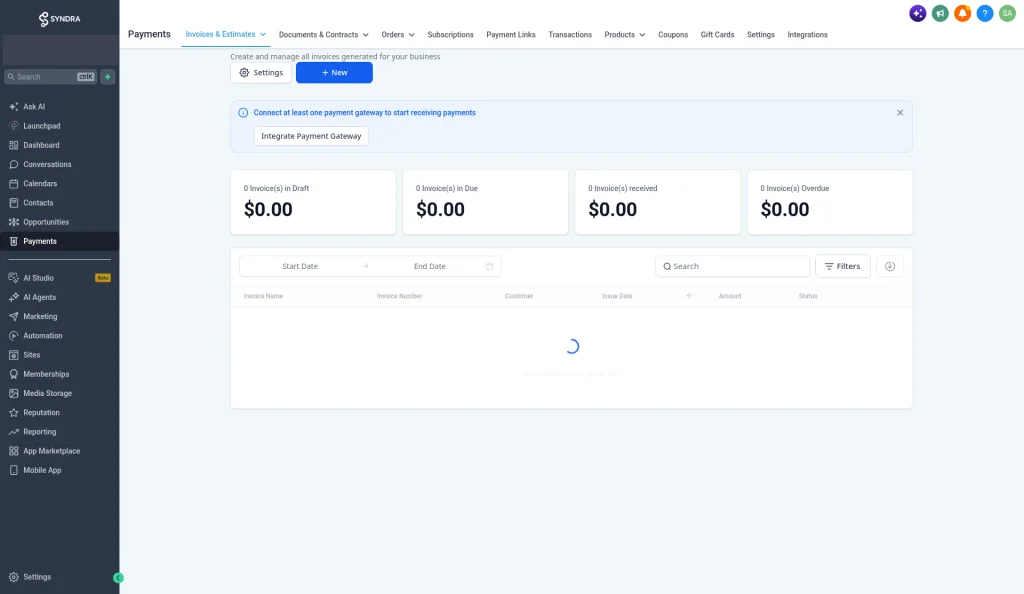
What you should see: a page titled Invoices with four cards across the top: Draft, Due, Received and Overdue, each with a count and a dollar total. If no payment account is connected yet, a blue banner says "Connect at least one payment gateway to start receiving payments". You can close it or ignore it for now.
Click New at the top right.
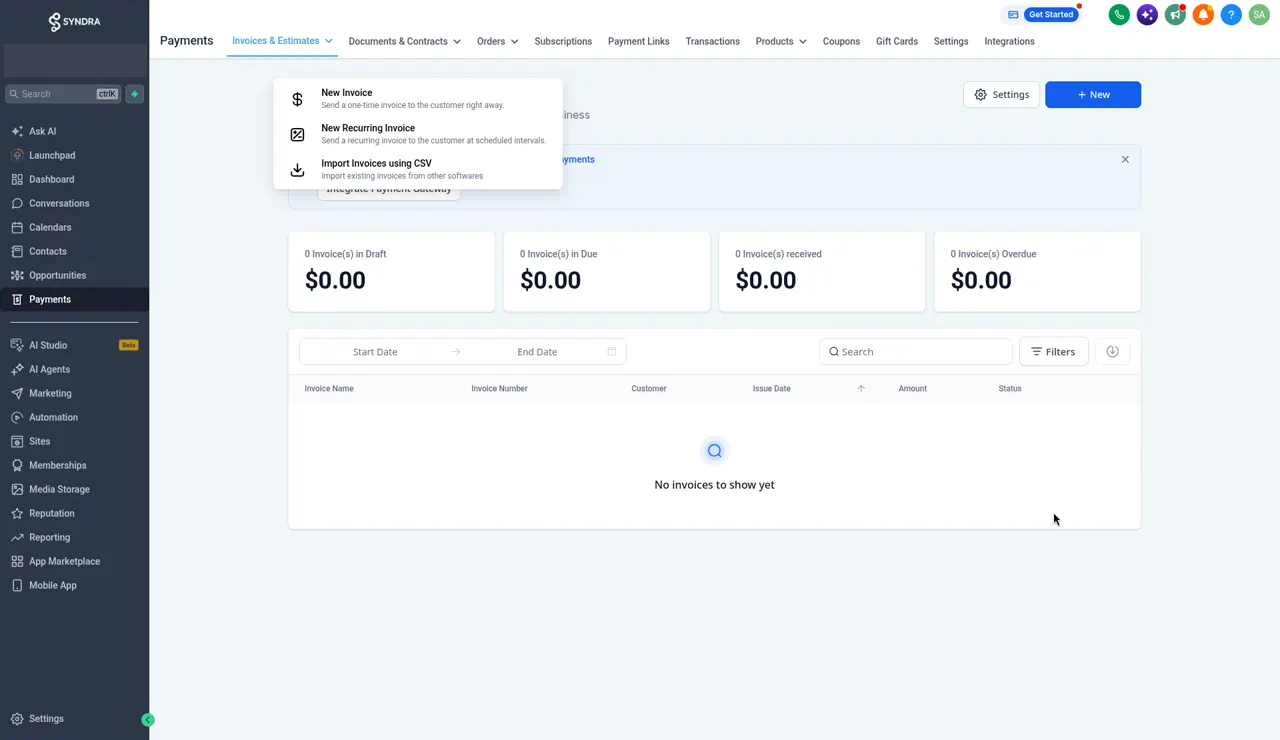
What you should see: a short menu with New Invoice, New Recurring Invoice and Import Invoices using CSV. Each option has a short description under it.
Click New Invoice.
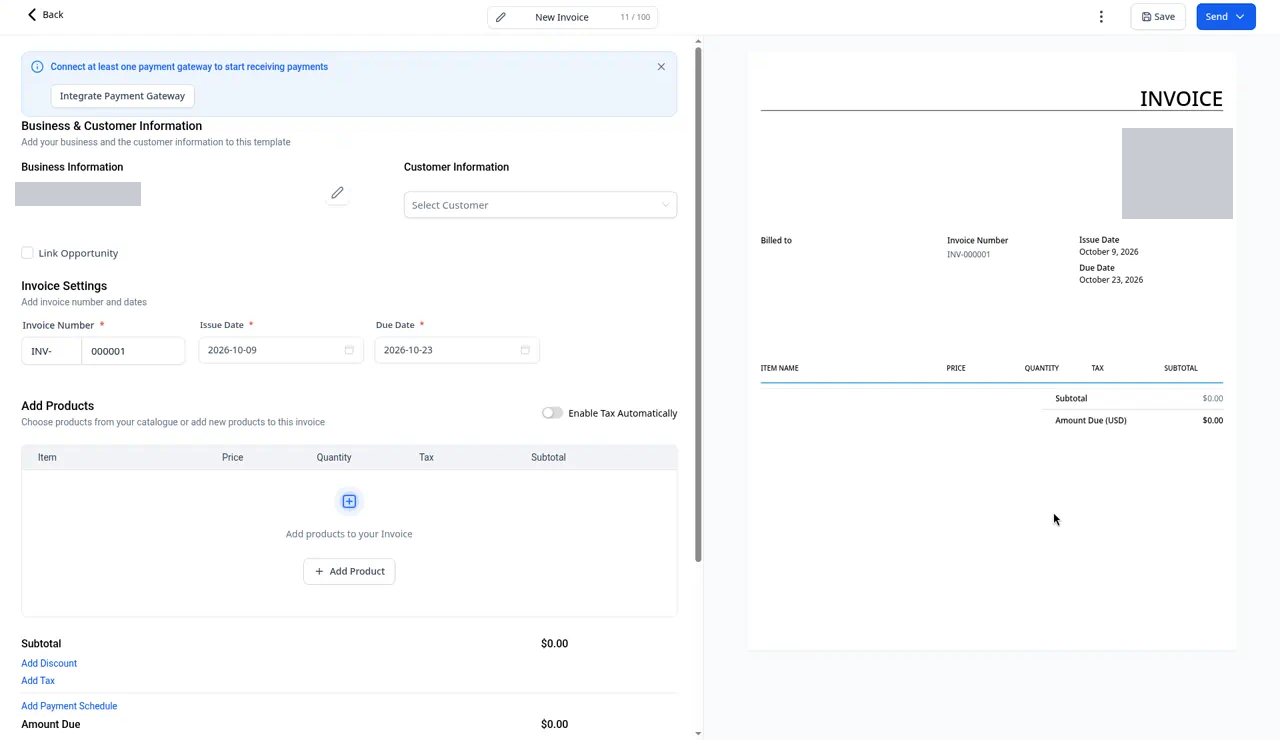
What you should see: the invoice form on the left and a live preview of the invoice on the right. Your business name is already filled in under Business Information. Opening the form doesn't create anything in your list yet.
Under Customer Information, click Select Customer and start typing the client's name or email.
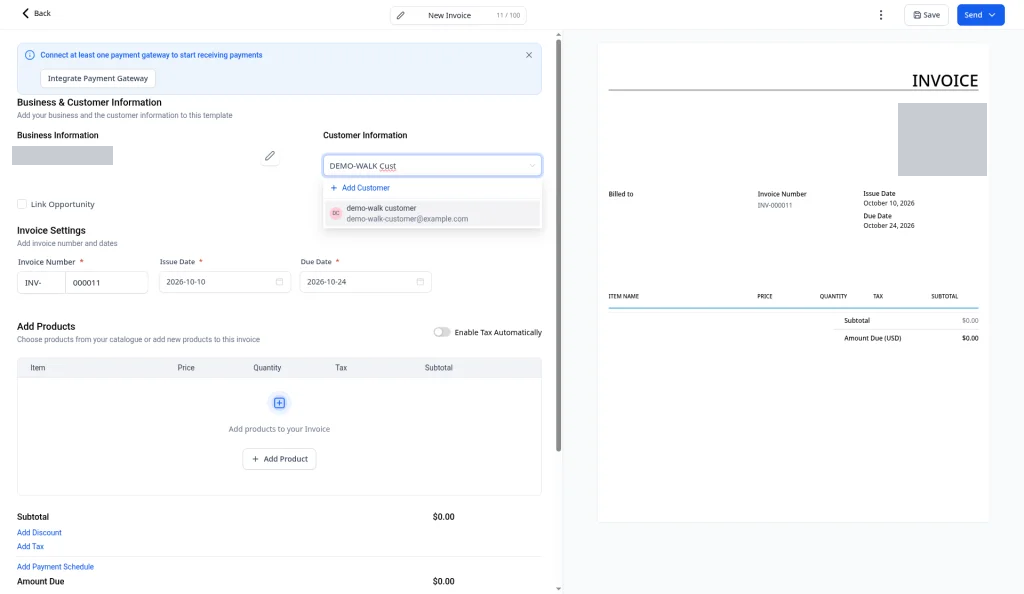
What you should see: contacts that match what you typed, by name or by email. Click the right one to select it.
If the client isn't in Syndra yet, click + Add Customer at the top of that list instead.
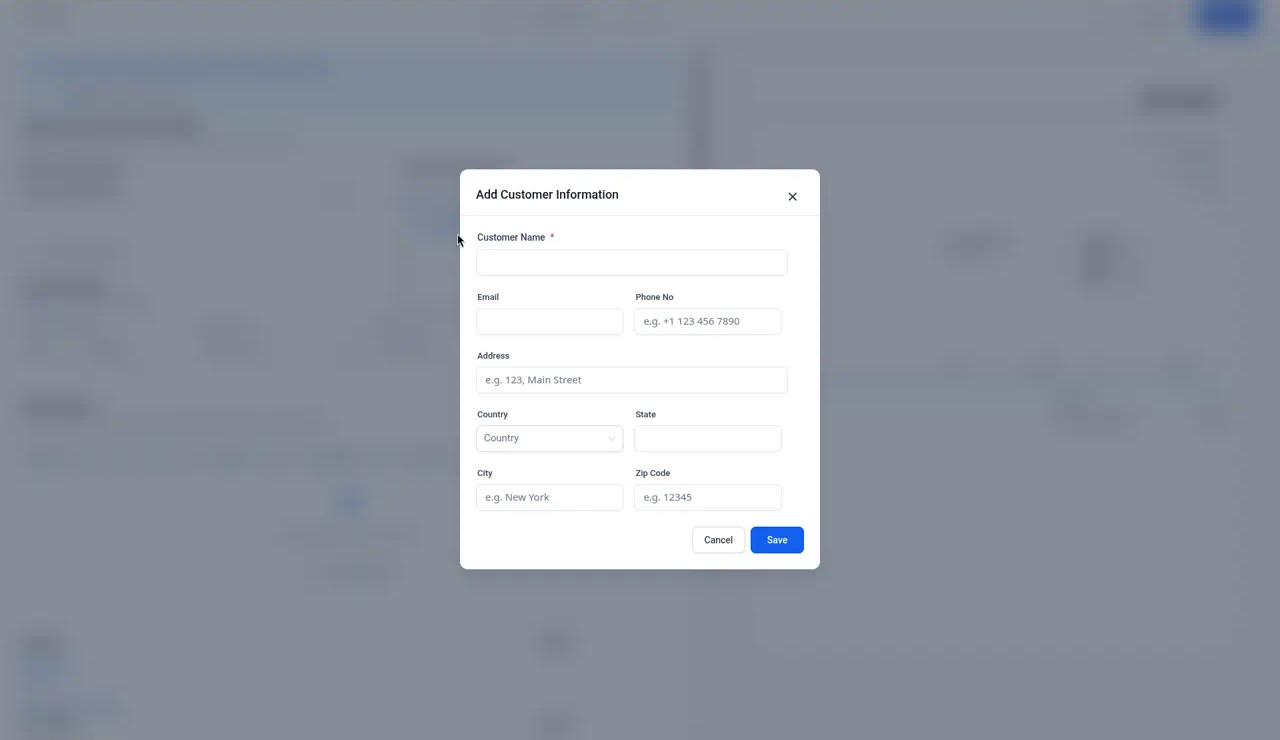
Fill in Customer Name (the only required field) and any of Email, Phone No, Address, Country, State, City and Zip Code, then click Save.
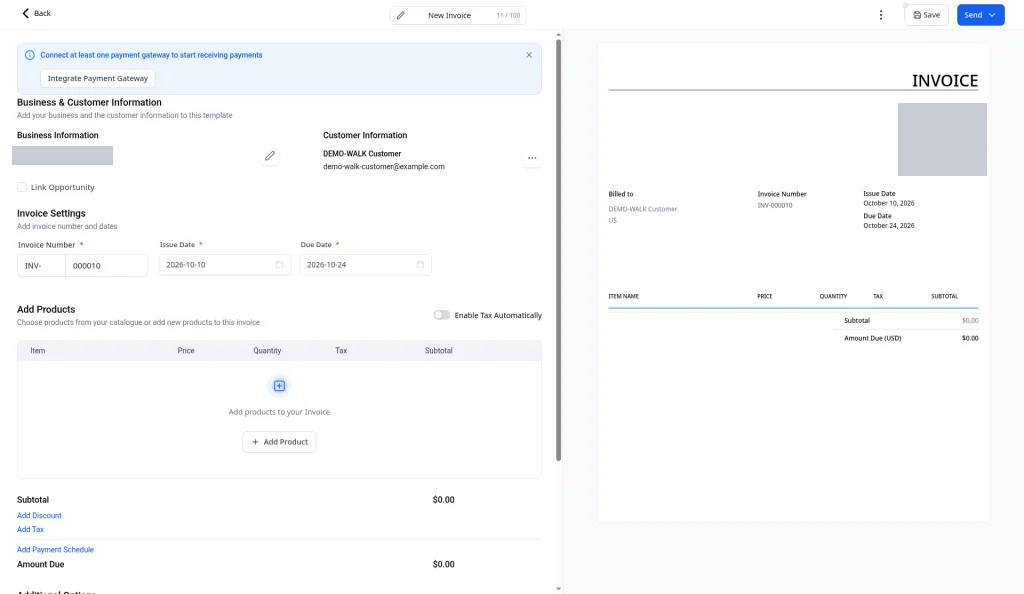
What you should see: the client's name and email appear under Customer Information, and their name appears under Billed to in the preview. Saving here creates a real contact in your Contacts list, so check the spelling first.
If this invoice belongs to a sale you're tracking in Opportunities, tick Link Opportunity. Otherwise leave it unticked.
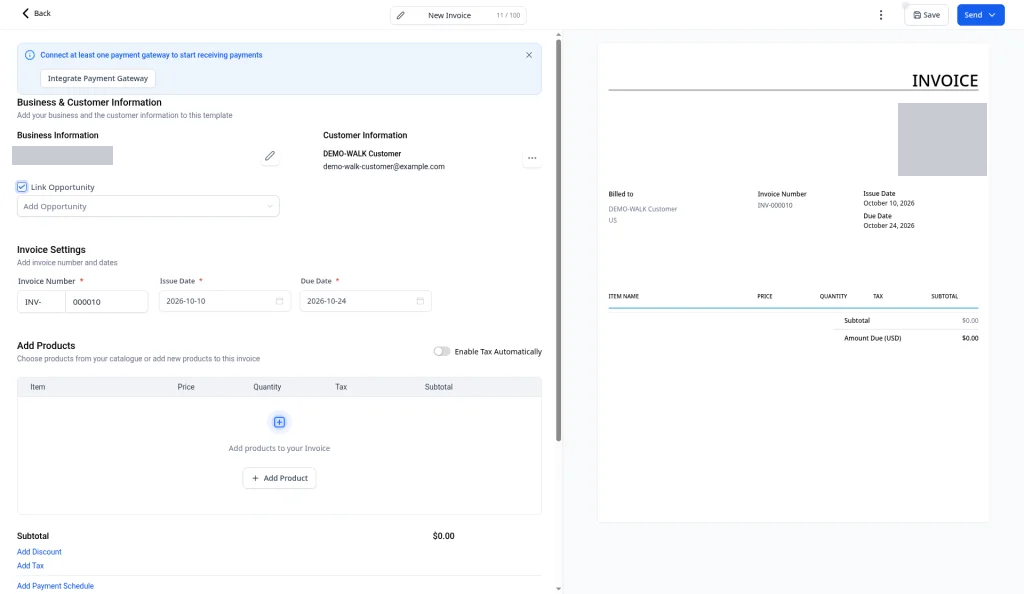
Open the Add Opportunity dropdown and choose the opportunity. It lists only that client's opportunities.
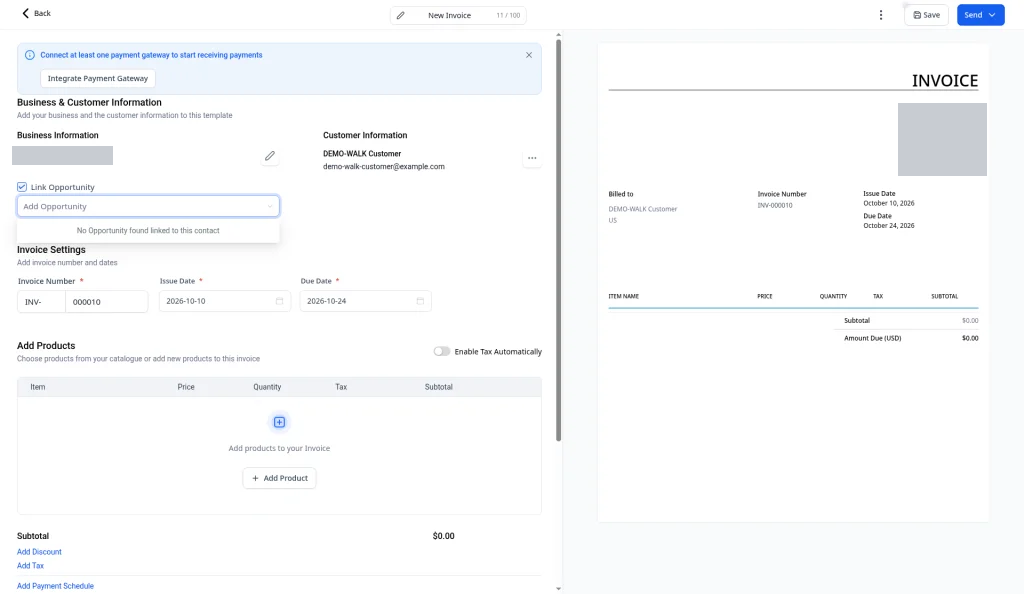
What you should see: if the client has no opportunities, the dropdown says "No Opportunity found linked to this contact". That's fine; untick Link Opportunity and carry on.
Under Invoice Settings, check the Invoice Number, Issue Date and Due Date. All three are required.
What you should see: the invoice number is in two parts: a prefix (INV-) and a number. Syndra fills the number in for you. It may skip ahead from your last invoice, so check it rather than expecting a particular number. Change the dates if you need to.
Under Add Products, click Add Product, then open Select Product on the new line.
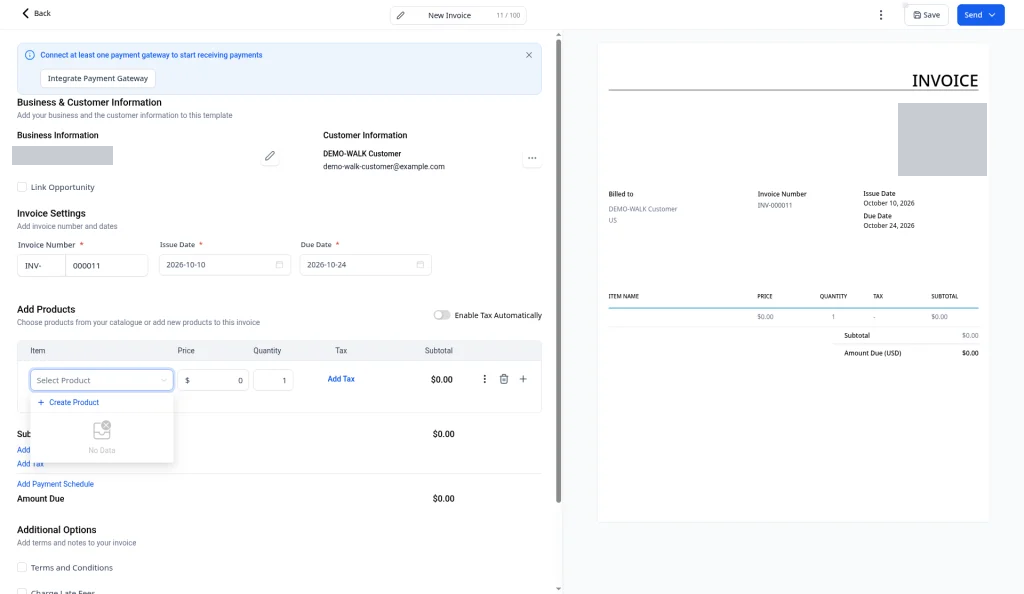
What you should see: your saved products, plus + Create Product at the top. If you haven't saved any products yet, the list says "No Data".
To add an item that isn't in your list, click + Create Product.
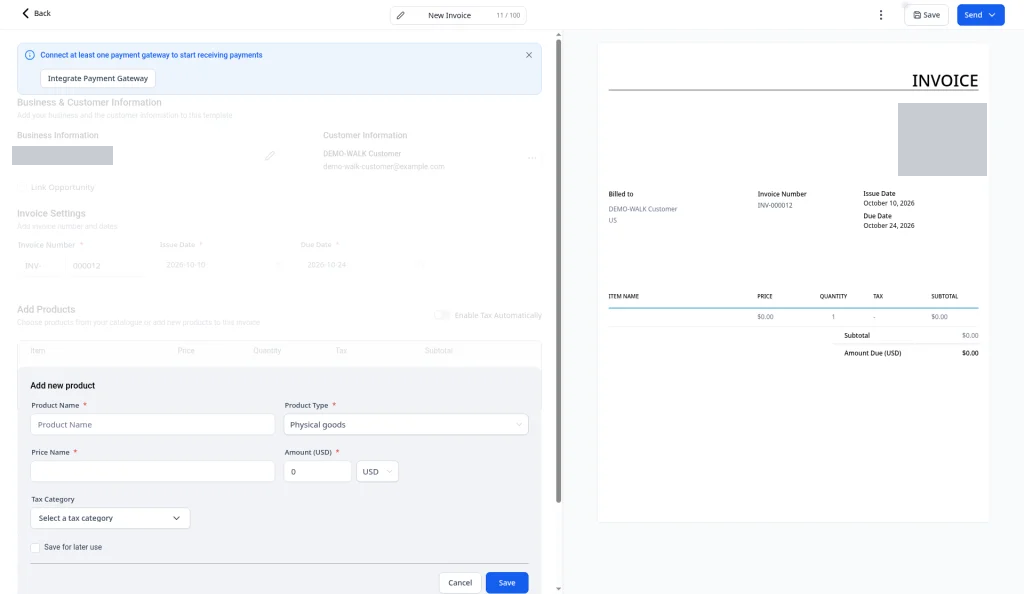
Fill in Product Name, Product Type (it starts as Physical goods), Price Name and Amount (USD), and choose a Tax Category if you use one. If this is a one-off item, leave Save for later use unticked. Click Save.
Check the line. You can change the Price ($) and Quantity right on it.
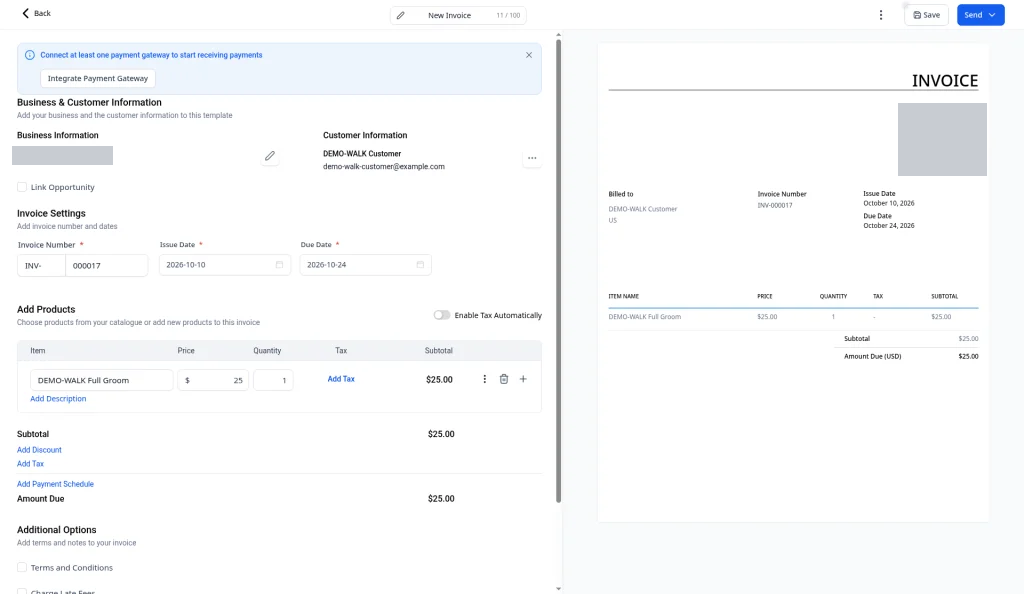
What you should see: each line shows Item, Price ($), Quantity, Add Tax and Add Description, with a ⋮ menu, a trash icon to remove the line, and + to add another line. Subtotal and Amount Due update as you edit, and so does the preview. Repeat steps 8 to 10 for each extra item.
To take money off, click Add Discount under the subtotal.
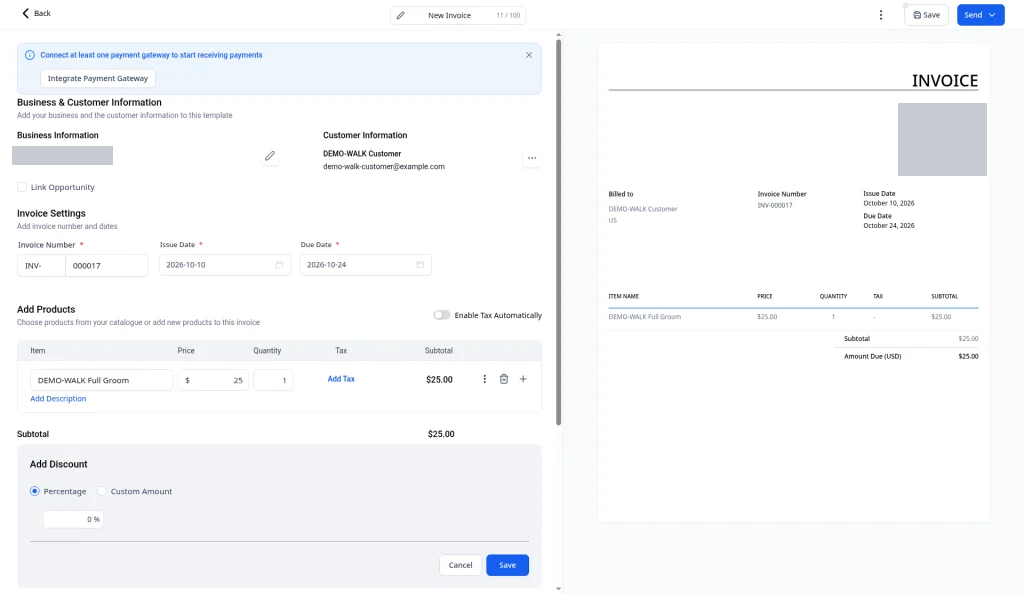
Choose Percentage or Custom Amount, enter the value, and click Save.
To add tax, click Add Tax.
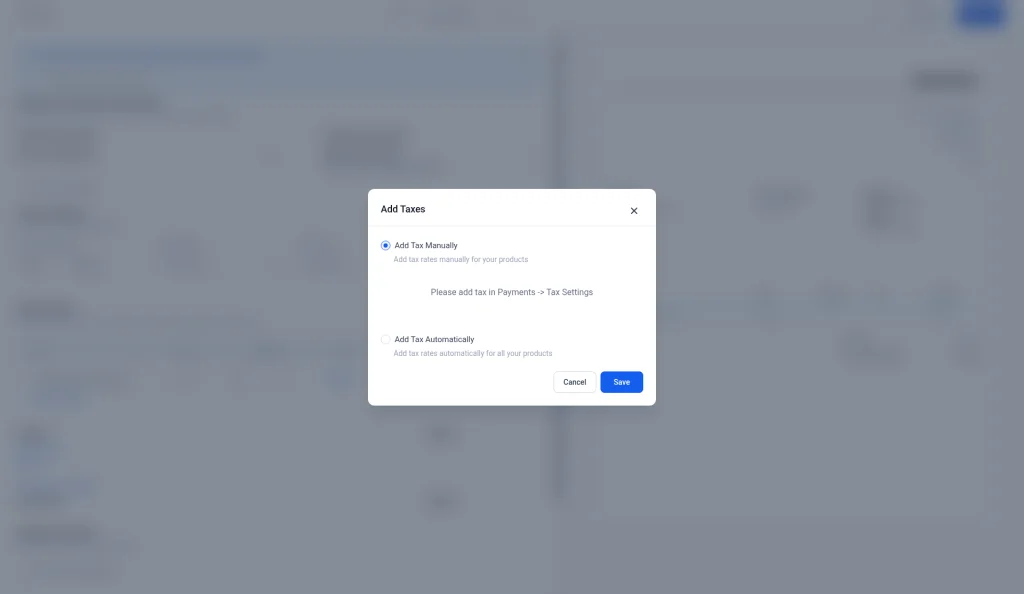
What you should see: a window with Add Tax Manually and Add Tax Automatically. If Add Tax Manually shows a note asking you to add tax in Payments > Tax Settings, you haven't set up any tax rates yet. Set them up there first, then come back. Check your tax rates with your tax professional.
To split the payment into parts, click Add Payment Schedule.
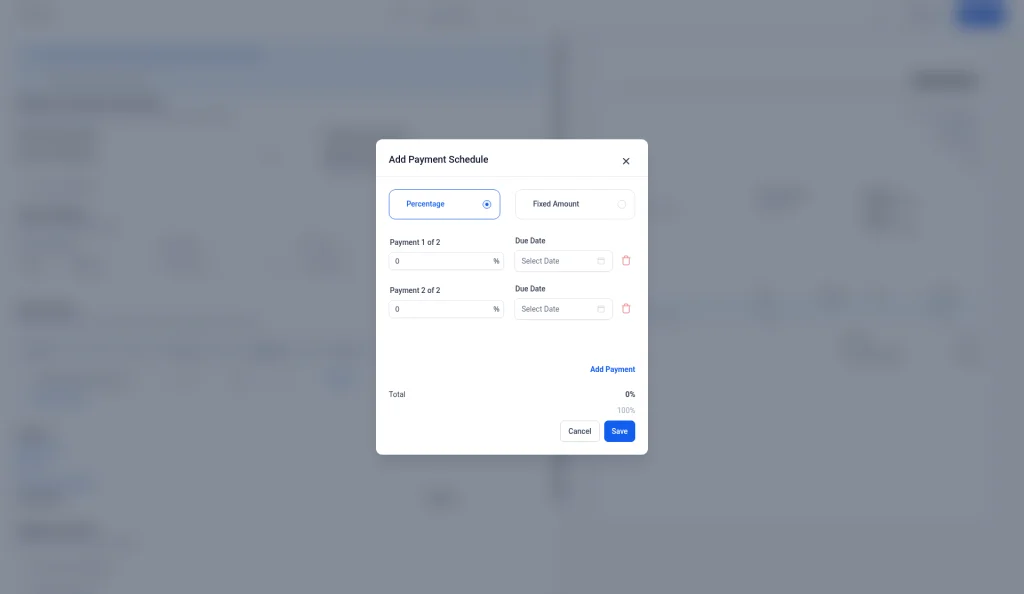
Choose Percentage or Fixed Amount. The schedule starts with 2 payments, each with an amount and a Due Date. Click Add Payment for more. The Total must come to 100% before you can save it.
Scroll down to Additional Options and tick any extras you want.
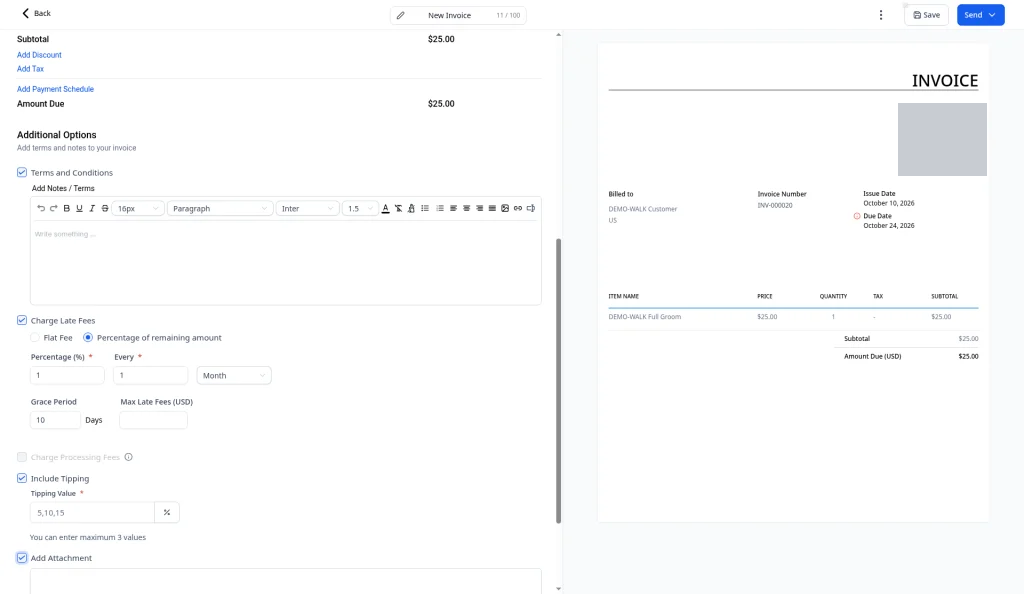
- Terms and Conditions: a text box with formatting tools for your notes or terms.
- Charge Late Fees: choose Flat Fee or Percentage of remaining amount, how often it repeats (Every [number] Month), a Grace Period (it starts at 10 days), and an optional Max Late Fees. Set this only if your business uses it.
- Include Tipping: suggested tip amounts, starting as 5,10,15. You can enter up to 3 values.
- Add Attachment: upload PNG, CSV or PDF files, up to 10 files and 20 MB.
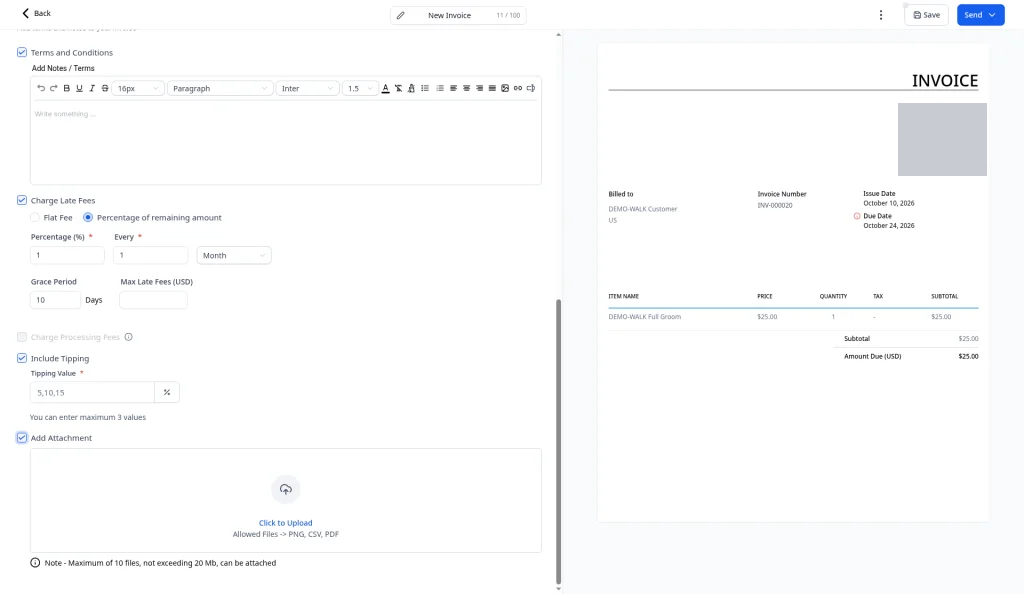
What you should see: Charge Processing Fees may be greyed out. Hover over the small i icon to see why.
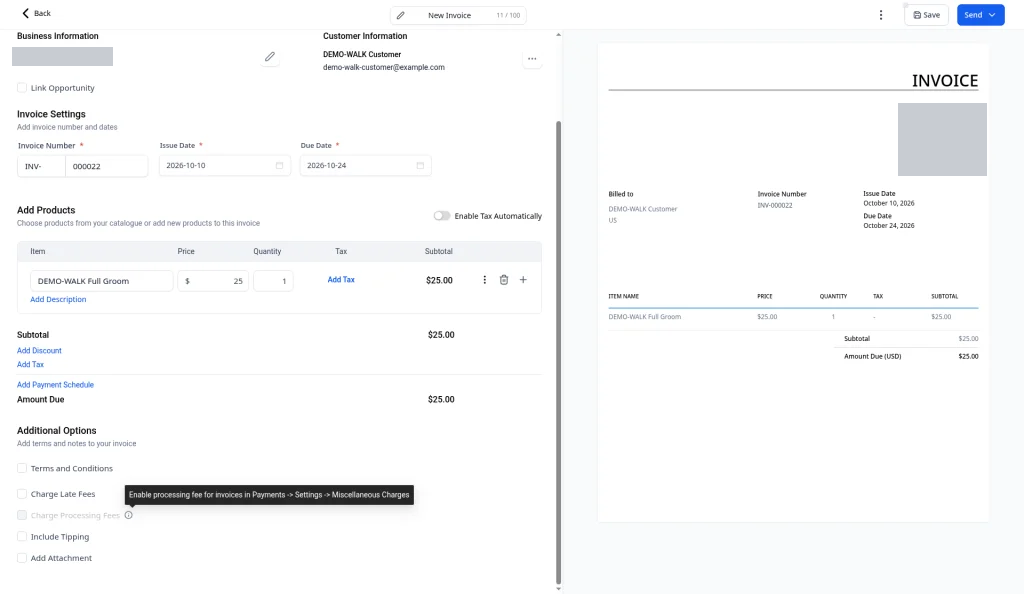
The tooltip says to turn it on in Payments > Settings > Miscellaneous Charges.
Check the preview on the right. Make sure the client, items, discount, tax and Amount Due look right. For a larger view, click the ⋮ menu at the top and choose Preview.
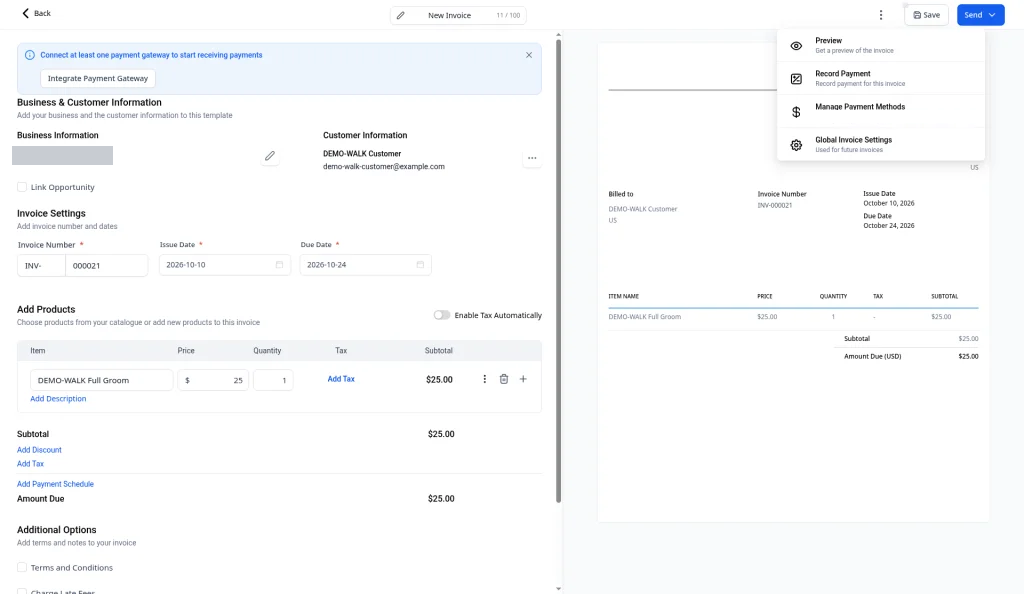
What you should see: the menu lists Preview, Record Payment, Manage Payment Methods and Global Invoice Settings. Don't use Record Payment unless you've actually received the money for this invoice.
Click Save at the top right.
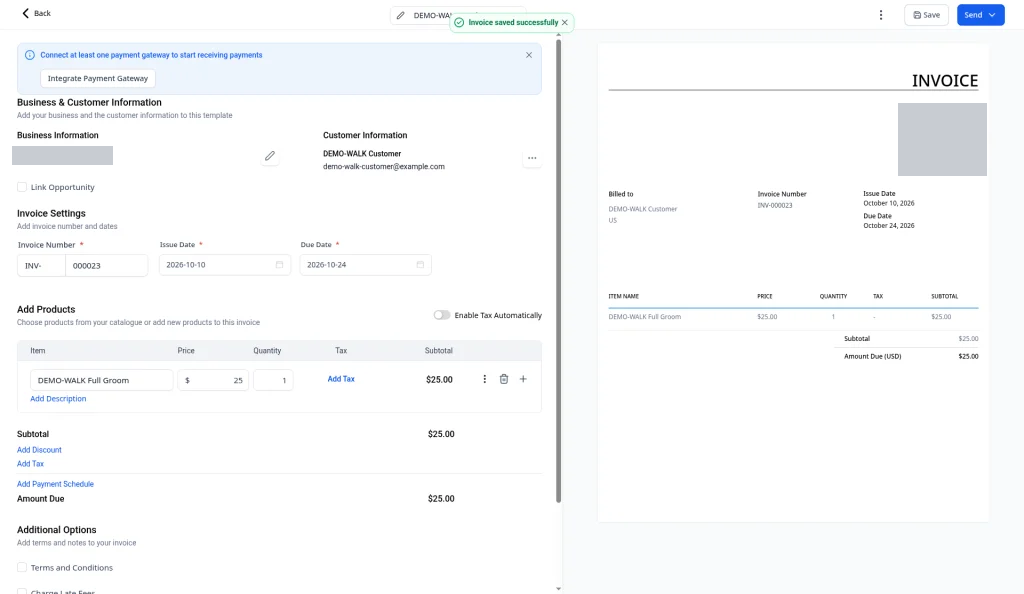
What you should see: a green message: "Invoice saved successfully".
What success looks like
Go back to Payments > Invoices & Estimates. Your invoice is in the list with the status Draft, and the Draft card has gone up. For example, after your first one it shows "1 Invoice(s) in Draft" with that invoice's total.
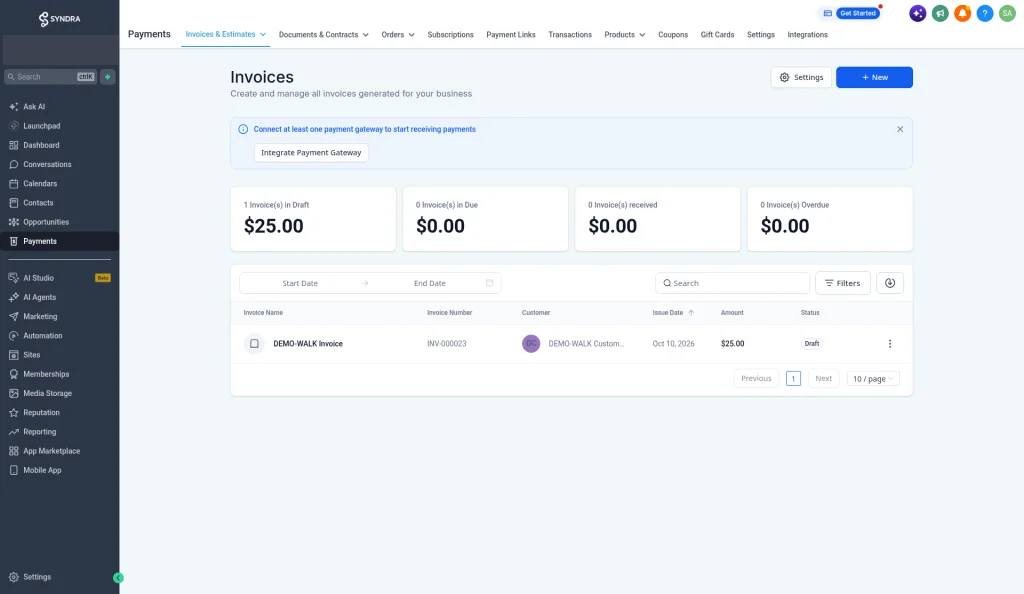
To work on a draft later, click the ⋮ at the end of its row.
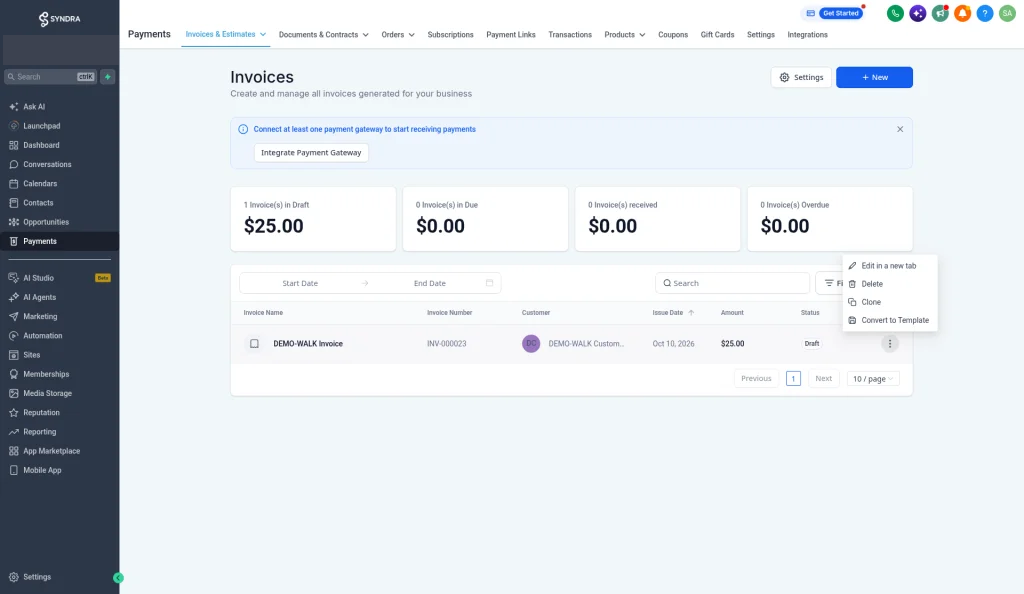
You'll see Edit in a new tab, Delete, Clone (makes a copy) and Convert to Template.
Common mistakes and troubleshooting
You chose New Recurring Invoice or Import Invoices using CSV by accident.
Those are different options. Click Back, then New > New Invoice.
You can't save because a field is marked in red.
Invoice Number, Issue Date and Due Date are required (they have a red asterisk). Fill them all in.
The client doesn't come up when you search.
Try their email instead of their name, or check the spelling. If they're truly new, use + Add Customer. Remember this creates a real contact.
You added a customer with a typo.
Saving Add Customer Information created a contact, so fix the spelling in Contacts as well as on the invoice.
The invoice number isn't the one you expected.
The number can skip ahead. Check it, and change it if your records need a specific number.
Add Tax asks you to add tax in Payments > Tax Settings.
That usually means no tax rates are set up yet. Add them in Payments > Tax Settings, then reopen the invoice. Check your tax rates with your tax professional.
The payment schedule won't save.
The payments must add up to 100%. Adjust the amounts or click Add Payment.
Charge Processing Fees is greyed out.
Hover over the i icon. The tooltip says to turn it on in Payments > Settings > Miscellaneous Charges.
You're worried you've recorded a payment by mistake.
Only use Record Payment if you've actually received the money for this invoice. Recording a payment isn't covered here, so if you think you recorded one by mistake, email us before you change anything.
You see a blue banner about payment gateways.
It doesn't stop you building or saving a draft.
The totals look wrong.
Check the Quantity and Price on each line, and any discount or tax you added.